
Trading setups: what an A+ setup is and how to build a playbook
A trading setup is the set of conditions that says a trade is on. Learn what makes an A+ setup, how to grade setups S to D and how to build a playbook.
A trading setup is the specific set of market conditions that tells you a trade is worth taking. It is the part of your strategy you look for on the chart - “a pullback that touches a rising VWAP”, “a break and retest of the overnight high” - with the entry, stop, target and size written around it.
Most traders have setups. Few have them written down, graded and measured. That’s the difference between “I think this one works” and “this setup has made +0.38R a trade over 64 trades, and my B-grade entries lose money”. This guide covers what makes an A+ setup, how to grade setups from S to D, how to write a playbook, four example setups, and how to decide which setups to keep.
Key takeaways
- A setup is a checklist, not a feeling. Write the conditions so they can be ticked off.
- An A+ setup has every confluence present and room for at least 2R.
- Grade before you enter, and size by the grade. Full risk on your best setups, less or nothing on the rest.
- Keep two or three setups and one page each in a playbook.
- Let each setup’s expectancy decide which ones you keep, after 50 or more trades.
Setup, trigger and strategy
| What it is | Example | |
|---|---|---|
| Strategy | The complete rules for one way of trading | Trend continuation, with stop, target and size rules |
| Setup | The conditions that must be present | Price above a rising VWAP; a pullback touches VWAP |
| Entry trigger | The event that puts you in | The first 5-minute close back above VWAP |
The setup tells you to pay attention. The trigger tells you to act. Traders who merge the two tend to enter early, because the setup “looks close enough”. For the full picture of how strategies are built, see what is a trading strategy.
The anatomy of a setup
Every well-written setup has the same five parts:
- Context - the market condition the setup needs: trending, ranging, after a gap, in the first hour.
- Confluences - the independent reasons that point the same way.
- Trigger - the exact event that puts you in.
- Invalidation - the price that proves the idea wrong, which becomes your stop.
- Target - where the trade should go, and the R:R that leaves you.
Write all five and anyone could find your setup on a chart. Leave out the context and you’ll take it on days it can’t work.
What makes an A+ setup?
An A+ setup is the trade you’d take at full planned risk every single time it appears. It isn’t about how confident you feel; it’s about how many of your conditions are met.
The A+ setup checklist
Every box ticked, before the entry - not after.
- The context agreesThe market is doing what this setup needs, such as trending for a pullback setup.
- Price is at a level that mattersVWAP, the prior day's high or low, the overnight range or the opening range.
- Every confluence is presentNot most of them. A missing one lowers the grade.
- The trigger is cleanThe candle closes where the rule says, not almost there.
- The stop is close and obviousA clear invalidation price, near enough to keep size sensible.
- There's room for 2R or moreNo major level sits between the entry and the target.
- It's the right time of dayInside the hours where this setup has worked for you.
- No warning signsNo high-impact news due, no choppy overlapping candles.
How to grade your setups from S to D
Grading turns “this looks good” into a number you can test. Pick the confluences your setup requires, count how many are present before you enter, and tie the grade to your size:
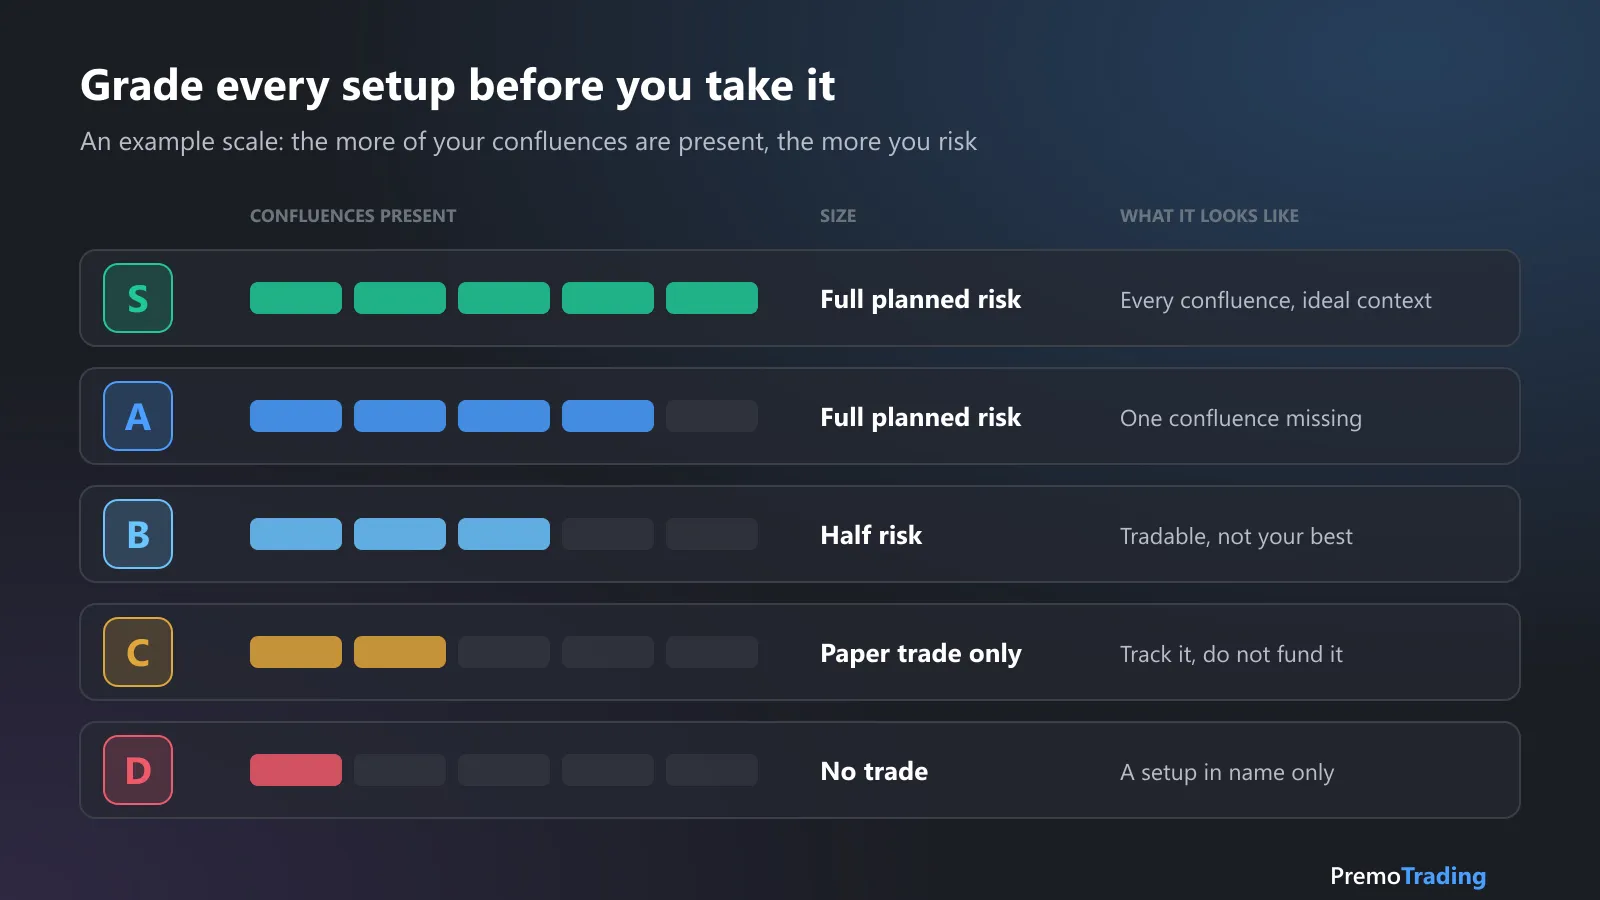
An example scale. Size follows the grade - never above your planned maximum.
| Grade | Confluences present | Size | What it means |
|---|---|---|---|
| S | All of them, in ideal context | Full planned risk | Your best trade |
| A | One missing | Full planned risk | A setup you take every time |
| B | Two missing | Half risk | Tradable, not your best |
| C | Three missing | Paper trade only | Track it, don’t fund it |
| D | One or none | No trade | A setup in name only |
Two rules make grading work. Grade before the entry, never after - a grade given after the result is just the result in disguise. And size never goes above your planned maximum, however good an S setup looks. The grade decides whether you take full risk or less, not whether you take more.
After 50 trades, compare your grades. If your B setups lose money and your A setups don’t, you’ve found free money: stop taking B setups.
Confluences that traders commonly use
| Confluence | What it tells you |
|---|---|
| VWAP | Who’s in control today: price above a rising VWAP favours longs |
| Moving averages | Trend direction and pullback zones, e.g. the 9 and 20 EMA |
| Key levels | Prior day high and low, overnight high and low, opening range |
| Market structure | Higher highs and higher lows, or a break of structure |
| Volume | Lighter volume on the pullback, heavier on the move |
| Options positioning | Large gamma levels where price often reacts - see gamma exposure |
Choose four or five that are independent. Three moving averages all saying “uptrend” are one confluence, not three.
Warning signs that lower the grade
- High-impact news due within the next few minutes.
- Choppy, overlapping candles and a flat VWAP.
- A major level between your entry and target, capping the reward.
- A stop so far away that the position would be too small to matter.
- You’re trading to win back a loss.
How to build a trading playbook
A playbook is one page per setup. It’s the reference you trade from and the yardstick you review against. Keep it short enough to read before the open.
SETUP: VWAP pullback                       GRADE SCALE: S / A / B / C / D
Market and time:  MNQ, 5-minute, 9:30-11:30 a.m. ET
Context:          Trending session, price above a rising VWAP
Confluences:      [ ] VWAP rising   [ ] 9 EMA > 20 EMA   [ ] lighter pullback volume
                  [ ] key level under the entry   [ ] room for 2R to the next level
Trigger:          First 5-minute close back above VWAP
Stop:             1 tick below the pullback low
Target:           Half at 2R, trail the rest under 5-minute higher lows
Expected R:R:     2:1 or better
Warning signs:    News within 10 min, flat VWAP, choppy candles
Examples:         3 screenshots of textbook trades, 1 of a failure
Stats:            Trades __ | Win rate __% | Expectancy __R | Avg R __
Copy it into your notes, or build it straight into a journal that tracks the stats for you.
Four example setups
These show how setups are written as rules. They’re illustrations, not recommendations.
1. VWAP pullback
- Context: trending session, price above a rising VWAP.
- Trigger: a pullback touches VWAP and a 5-minute candle closes back above it.
- Stop: below the pullback low. Target: 2R, then trail.
The full worked example, with a chart, is in what is a trading strategy.
2. Opening range breakout
- Context: the first 15 minutes set a range; volume is above average.
- Trigger: a 5-minute close outside the range.
- Stop: the middle or the opposite side of the range. Target: a multiple of the range height, or the next key level.
3. Fair value gap retrace
- Context: a strong displacement move leaves a gap between candle wicks.
- Trigger: price returns into the gap and rejects it.
- Stop: beyond the gap. Target: the swing that created it, then beyond.
More in our guide to the fair value gap and the ICT FVG reversal.
4. Failed breakdown (reclaim)
- Context: price breaks below a key level, such as the prior day’s low, and fails to follow through.
- Trigger: a 5-minute close back above the level.
- Stop: below the low of the failed break. Target: the middle of the range, then the opposite side.
Review by setup: keep what pays
The point of writing setups down is to measure each one on its own. Your overall P&L can hide a great setup carrying a bad one.
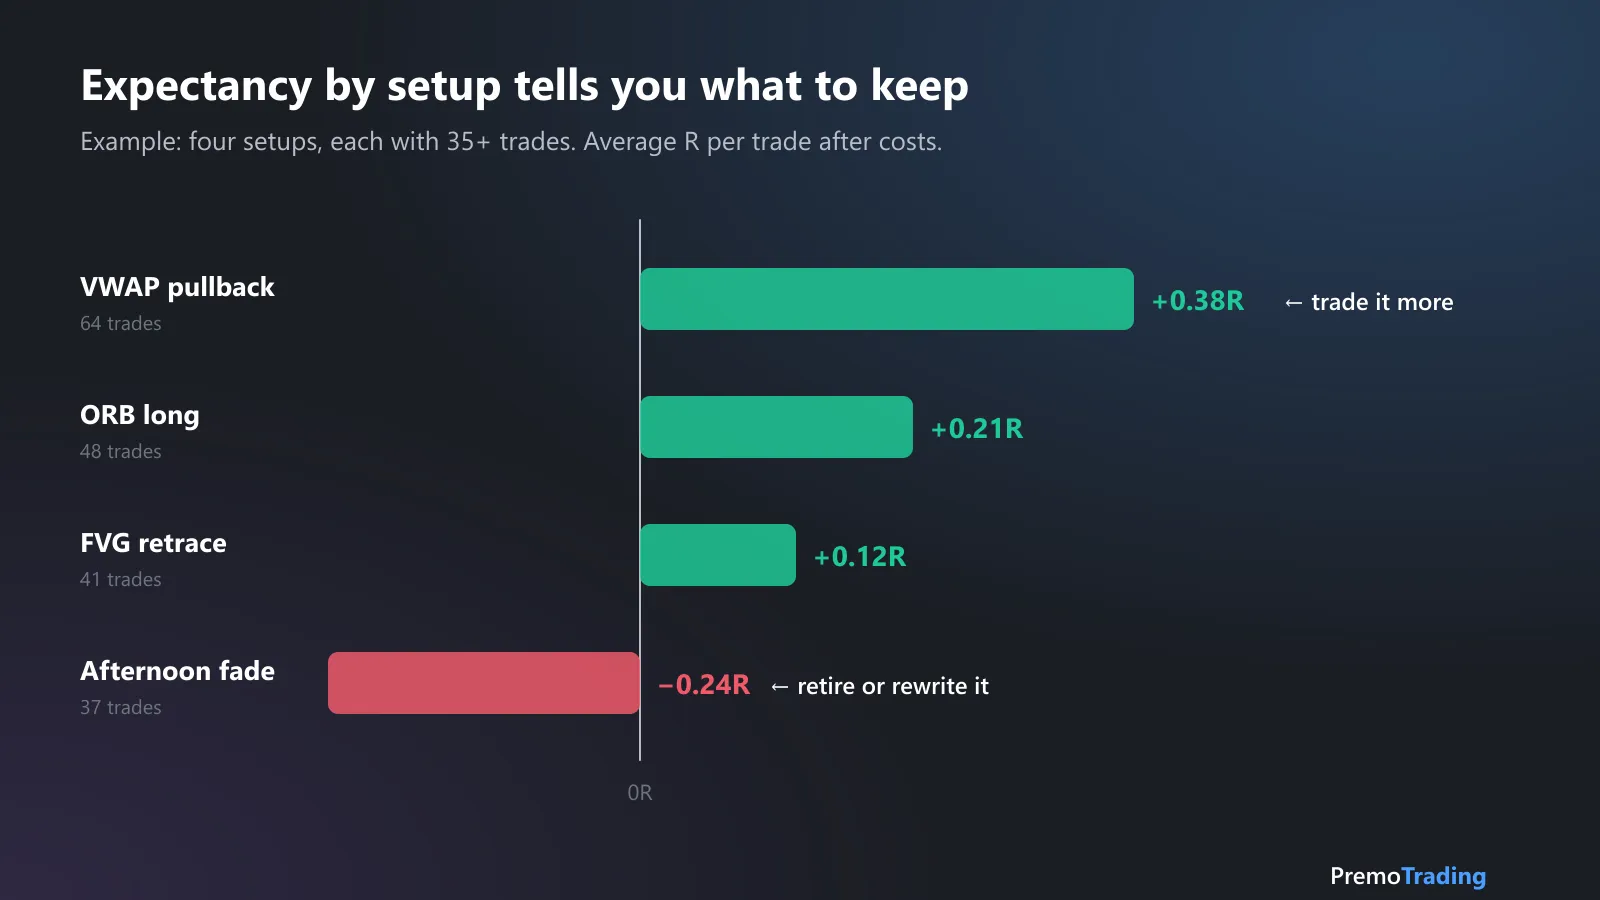
Example: the afternoon fade costs a quarter of an R per trade. Dropping it improves the whole account.
For each setup, after 50 or more trades, look at:
- Expectancy in R - is it positive after costs? This is the number that decides. See expectancy.
- Win rate and average R - which one is driving the result?
- Planned R vs realized R - are you taking the profit the setup offers, or cutting winners short?
- Results by grade - do your A setups actually beat your B setups?
- Results by time of day - does the setup only work in the first hour?
Then decide:
| What the numbers say | What to do |
|---|---|
| Positive expectancy, followed as written | Keep it, and consider giving it more of your attention |
| Negative, but the losers broke the rules | The setup isn’t the problem - your execution is |
| Negative over 50+ trades taken by the rules | Retire it, add a filter, or move it to paper trading |
| Positive only at certain times or grades | Restrict it to those times or grades |
Grade the execution, not just the outcome
A setup can be perfect and the trade still lose. Equally, a sloppy trade can win by luck. If you only look at P&L, you’ll learn the wrong lessons from both.
So grade each trade twice: the setup (how good was the opportunity?) and the execution (did you take it the way the playbook says?). A clean loss at your planned stop is a well-executed trade. A win where you moved your stop and skipped the target is a badly executed one, and it teaches a habit that will eventually cost you. More on the psychology of that in trading psychology.
How Premo helps you build a playbook
Premo’s Playbook turns this whole process into a few clicks:
- Write each setup with a grade from S to D, the confluences it needs (VWAP, EMAs, levels, structure, volume or your own), your stop and target rules and the R:R you expect.
- Review each trade against its setup. Tick the confluences that were really there and any warning signs; the stop and target fill in from the setup’s rules.
- See the R you made vs the R you planned, and grade your execution against the setup’s grade.
- Get a Confidence score out of 100 that rewards process over luck.
- Every setup gets its own card with win rate, expectancy and average R, and Trader Summary filters to any setup - or to the trades you haven’t reviewed yet.
See how the Playbook works, or how it compares with other journals on the comparison page.
Build your playbook in Premo14 days free, then $19.99/month plus tax. Cancel before your trial ends and you won't be charged. New customers only.
Start your 14-day free trialThis article is educational and is not investment advice. The setups, grading scale and statistics shown are examples, not recommendations or results. Trading futures involves substantial risk of loss.
Frequently asked questions
What is a trading setup?
A trading setup is the specific set of market conditions that tells you a trade is worth taking - for example, a pullback that touches a rising VWAP in an uptrend. It is the part of a strategy you look for on the chart. The entry trigger, stop, target and size are written around it.
What is an A+ setup?
An A+ setup is a setup where every condition you require is present: the market context agrees, price is at a meaningful level, all your confluences line up, the trigger is clean, the stop is close and well defined, and there is room for at least 2R. It is the trade you would take at full planned risk every time it appears.
What are confluences in trading?
Confluences are independent reasons that point to the same trade, such as a rising VWAP, aligned moving averages, a key price level, supportive market structure and volume. The more independent confluences line up, the higher the quality of the setup.
How many setups should a trader have?
Two or three is enough for most day traders. Each setup needs 50 to 100 trades before its statistics mean much, so a long list of setups spreads your sample too thin to learn anything.
How do you grade a trading setup?
Decide the confluences your setup needs, then grade each occurrence by how many are present before you enter - for example S when all are present, A with one missing, B with two missing, and C or D below that. Tie the grade to size: full planned risk on S and A, half on B, nothing on C and D.
What is a trading playbook?
A trading playbook is a written collection of your setups, one page each, with the conditions, confluences, entry trigger, stop, target, expected risk-reward, warning signs, example charts and each setup's own statistics. It is the reference you trade from and review against.
When should you stop trading a setup?
When its expectancy is negative over a meaningful sample - 50 or more trades taken by the rules - and the losses aren't explained by execution mistakes. Then retire it, rewrite it with a new filter, or move it to paper trading until it proves itself again.
What is the difference between a setup and an entry trigger?
The setup is the picture that tells you to pay attention; the trigger is the exact event that puts you in the trade. A pullback to VWAP is a setup; the first candle that closes back above VWAP is the trigger. Keeping them separate stops you from entering early.